


How to Use A Camera
So you are wondering how to use a camera.
Maybe you are wanting to get some photos of your kids in between sessions with me?
Or maybe you want to take up landscape photography?
Or you want to know how to use a camera so you can take pictures of products you are selling?
We will be discussing dslr cameras in this article, but most of this info can be applied to film cameras, if you’re interested in film photography. I actually got my start with black and white film photography 15 years ago and it was an easy transition to dslr. (If you are interested in the history of cameras, check out this article)! So whether you are looking for tips for dslr or film, this will give you some great information. In this article, we will provide you with some tips on how to use your camera and take amazing photos!
Overview- How to Use a Camera
Most cameras are now digital so the pictures will immediately appear on your screen. This allows you to check how your picture looks before taking it. Many digital cameras have a built in viewer that allow you to see what is being captured by the lens just prior to taking the photo.
If your camera came with an instruction manual, be sure to read through this carefully as well. If not then look online for basic instructions or how-to videos on youtube that can show you how to use your particular brand and model of camera. We will talk about the following important topics when you need to know in order to learn how to use a camera:
- Parts of a camera
- Basic Functions
- Auto vs. Manual
- Lenses
- Exposure Triangle
- ISO
- Aperture
- Shutter Speed
- White Balance
Parts of a Camera
Most digital SLR cameras have the same basic parts. The body, lens, viewfinder (or screen), shutter button, and dials or buttons to control various functions.
The body is the main part of the camera and it contains the sensor that captures the image. The lens is attached to the body and it determines how much of the scene will be captured in the photo. The viewfinder is where you look through to compose your shot. It’s usually located on top of the camera body. The shutter button is how you take a picture and the dials or buttons control things like exposure, focus, white balance, and more.
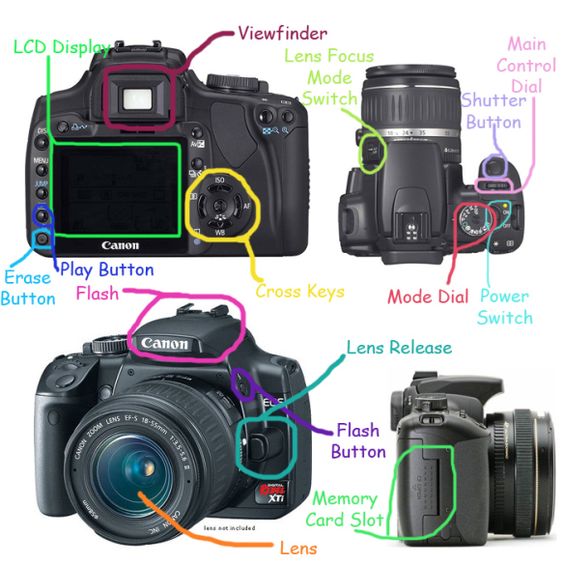
The explanations of these things should all be in your manual. Since where these buttons are vary between cameras, I suggest you read your manual to find out about your specific camera. There are a few important parts that I will point out throughout the article that you will need know to learn how to use a camera.
Basic Functions
The main things you need to know before you start really diving in to how to use a camera are how to take a picture and how to put a lens on.
To take a picture, you’ll just push the button on the right top side, called the shutter release button. Some cameras have two buttons on top, one for autofocus and one for taking the picture.
To put a lens on, just line up how you would to put it in your camera body and twist. It should click into place, usually with an audible “click”. There should be a white or red dot on your lens and on your camera body line those up before pushing together and clicking into place. The most important thing to remember is how to take it back off. Never force the lens off or you might break something very expensive! Just hold down the release button while twisting counter clockwise until it comes off.
How to Use a Camera- Auto Vs. Manual
Auto
Auto mode is perfect for those who are new to photography and want to learn how to use a camera without having to worry about all the different settings. In this mode, the camera will automatically choose the settings it thinks will give you the best picture. This is a great mode to start out in because it takes the guesswork out of photography. You can then move on to manual mode once you feel more comfortable with how your camera works. To use auto mode, you just turn the mode dial to ‘A’ and begin shooting!
Manual
Manual mode is for those who want more control over their photos. In this mode, you control all the settings, which allows you to achieve the look and feel that you want in your photos. This can be a bit daunting for those are new to photography, but with a lot of practice and some classes, it can be done! For manual, you more the mode dial to ‘M’ and use the knowledge you have about ISO, shutter speed, and aperture to adjust the settings for the look you are wanting. This is probably the most important and most difficult part of learning how to use a camera to achieve truly amazing photos.
How to Use a Camera- Lenses!
When shopping for a lens, you’ll want to consider what type of photography you want to do. There are zoom lenses, which allow you to change the focal length, and prime lenses, which have a fixed focal length. The ISO you use will change how sharp the photo is, how much light your camera can capture, and how grainy the picture looks (great for artsier shots). You’ll also need to learn how aperture affects how the lens renders how the photo turns out.
When it comes to lenses, there are many things to consider. Lenses are expensive! Often more than the camera body. If you just want one good lens to be able to get great images of your kids between sessions with me, I suggest a 50mm 1.8. The 50 mm means you don’t have to be super far away, but it also won’t distort the image if you don’t position yourself right. The 1.8 is the lowest aperture the lens can go. We’ll talk about why that is important below. Knowing what lenses do and which one to get is an important thing to understand so you know how to use a camera.
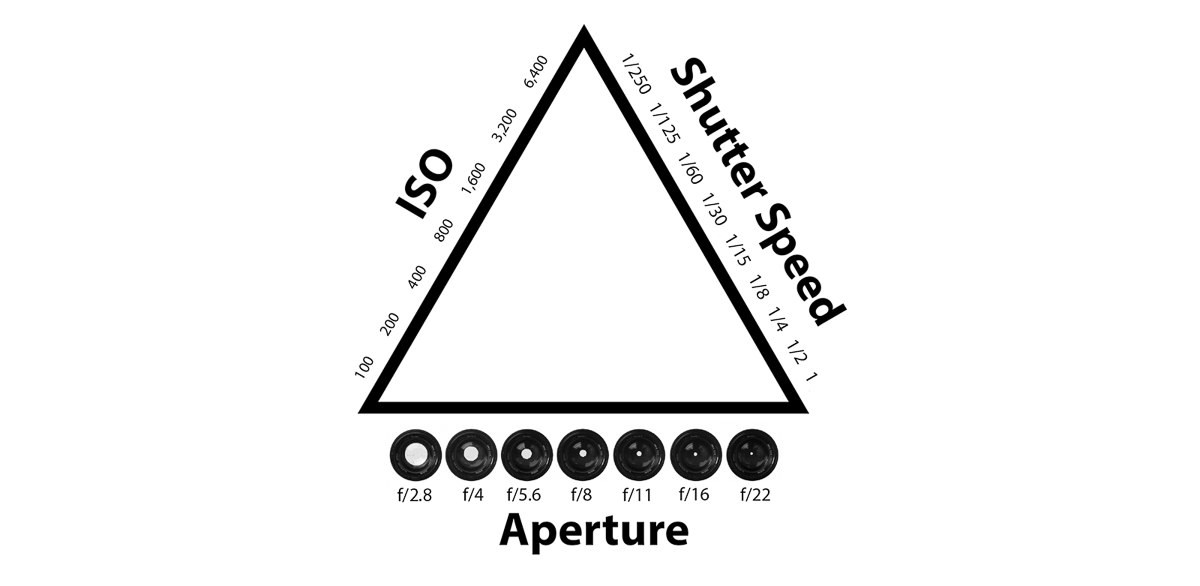
The Exposure Triangle
The exposure triangle is a term used in photography to describe how the three elements of shutter speed, aperture, and ISO work together to create an image. The triangle is called that because it’s always in balance, just like a real triangle. If you change one element, you have to change another to keep the triangle in balance.
ISO
What is ISO and how does it relate to how to use a camera? ISO is how sensitive your camera sensor is to light. The higher the ISO, the more sensitive it is, but also the more noise (graininess) will be in your photo. A low ISO is great when you have enough light to get your other settings where you want. A higher ISO is great for photos where you need a fast shutter speed in lower light.
Shutter Speed
What is shutter speed? Shutter speed is how long the shutter stays open to let light into the camera. The longer the shutter stays open, the more light you will capture, but also the more chance there is for you to have motion blur. A short shutter speed is great for photos of action or movement. The shutter speed it measured in hundredths of a second. So if someone says their shutter speed is 320, they actually mean 1/320 of a second. If the shutter speed is 1000, it is actually 1/1000, so the shutter is open a smaller amount of time. For photos of your kids between sessions with me, your shutter speed may be anywhere from 250 to 2500 depending on how much light is available and if your child is moving.
Aperture
Aperture is how wide the lens opening is. The wider the aperture, the more light that will be let in, but also the more blur will be in the background. A narrow aperture is great for photos with a lot of detail in the background. Aperture is measured in f-stops and is denoted by an ‘f’ followed by a number. Most lenses have a range of apertures that they can do. For example, my 50 mm 1.8 lens has an aperture range of f1.8-f22. Most lenses have apertures that are divisible by 2. So if your lens says it goes from f4-f16, that means the two apertures in between are 5.6 and 11. If your lens says it goes from f1-f32, that means the two apertures in between are 1 and 32!
Aperture controls how blurry or how clear everything is in the background of your photos. Photographers usually aim for a subject in focus and then a blurry background to create better depth of field, but it can also be harder to get your subject in focus. Play around with different apertures to see what you like best that still gets your subject in focus.
White Balance
One of the more confusing aspects of photography for beginners is white balance. What is it? Why do I need to worry about it? Kelvin versus Auto White Balance? And how do I change it?
White balance is how your camera compensates for different types of light. Your eyes automatically adjust for different types of light, but cameras can’t do that. So you have to tell your camera how to compensate by changing the white balance setting. Kelvin is the scale that photographers use to measure the color temperature of light. Most cameras have a Kelvin setting, but some have an auto white balance setting that will automatically adjust the white balance according to the type of light.
So which one should you use? Kelvin or auto white balance? That depends on your goals. For someone just wanting good pictures of their kids between sessions, I would stick with auto white balance. Being in the moment and capturing your child without missing an opportunity, in my opinion, outweighs shooting in kelvin. You can easily turn everyday moments into beautiful lifestyle shoots. I photographed my kids picking oranges the other day! But, if you have more controlled or consistent light, kelvin is the better overall option.
Wrapping Up How to Use a Camera
If you’re just starting out in photography, then learning how to use your camera is a great place to start. In this article, we’ve explained the basics of how to use a camera – including how to control exposure, choose the right lens, and set white balance. We know that taking photos between sessions can be challenging because kids are always on the move, so we hope these tips will help you capture some great shots! If this article is too overwhelming and you would prefer to let a professional handle capturing pictures of your kids, feel free to reach out to set up a consultation!


